
Downloads · 30 days
471
2% of all-time downloads
yuxi-liu-wired/CSD
CSD is a machine learning model from yuxi-liu-wired. Use it for the machine learning task on the model card, and read the license before you ship it in a product. The card lists the license as mit.
Downloads · 30 days
471
2% of all-time downloads
All-time downloads
23.4K
Public
Parameters
305M
4.9 GB on disk
Likes
14
Public
Click a slice to open those files.
.pth2.4 GB · 44%
How the weights are stored.
F16304M · 100%
From the Hugging Face model README
Cloned from learn2phoenix/CSD.
Their model (csd-vit-l.pth) downloaded from their Google Drive.
The original Git Repo is in the CSD folder.
The model CSD ("contrastive style descriptor") is initialized from the image encoder part of openai/clip-vit-large-patch14. Let $f$ be the function implemented by the image encoder. $f$ is implemented as a vision Transformer, that takes an image, and converts it into a $1024$-dimensional real-valued vector. This is then followed by a single matrix ("projection matrix") of dimensions $1024 \times 768$, converting it to a CLIP-embedding vector.
Now, remove the projection matrix. This gives us $g: \text{Image} \to \R^{1024}$. The output from $g$ is the feature vector. Now, add in two more projection matrices of dimensions $1024 \times 768$. The output from one is the style vector and the other is the content vector. All parameters of the resulting model was then finetuned by tadeephuy/GradientReversal for content style disentanglement, resulting in the final model.
The original paper actually stated that they trained two models, and one of them was based on ViT-B, but they did not release it.
The model takes as input real-valued tensors. To preprocess images, use the CLIP preprocessor. That is, use _, preprocess = clip.load("ViT-L/14"). Explicitly, the preprocessor performs the following operation:
def _transform(n_px):
    return Compose([
        Resize(n_px, interpolation=BICUBIC),
        CenterCrop(n_px),
        _convert_image_to_rgb,
        ToTensor(),
        Normalize((0.48145466, 0.4578275, 0.40821073), (0.26862954, 0.26130258, 0.27577711)),
    ])
See the documentation for CLIPImageProcessor for details.
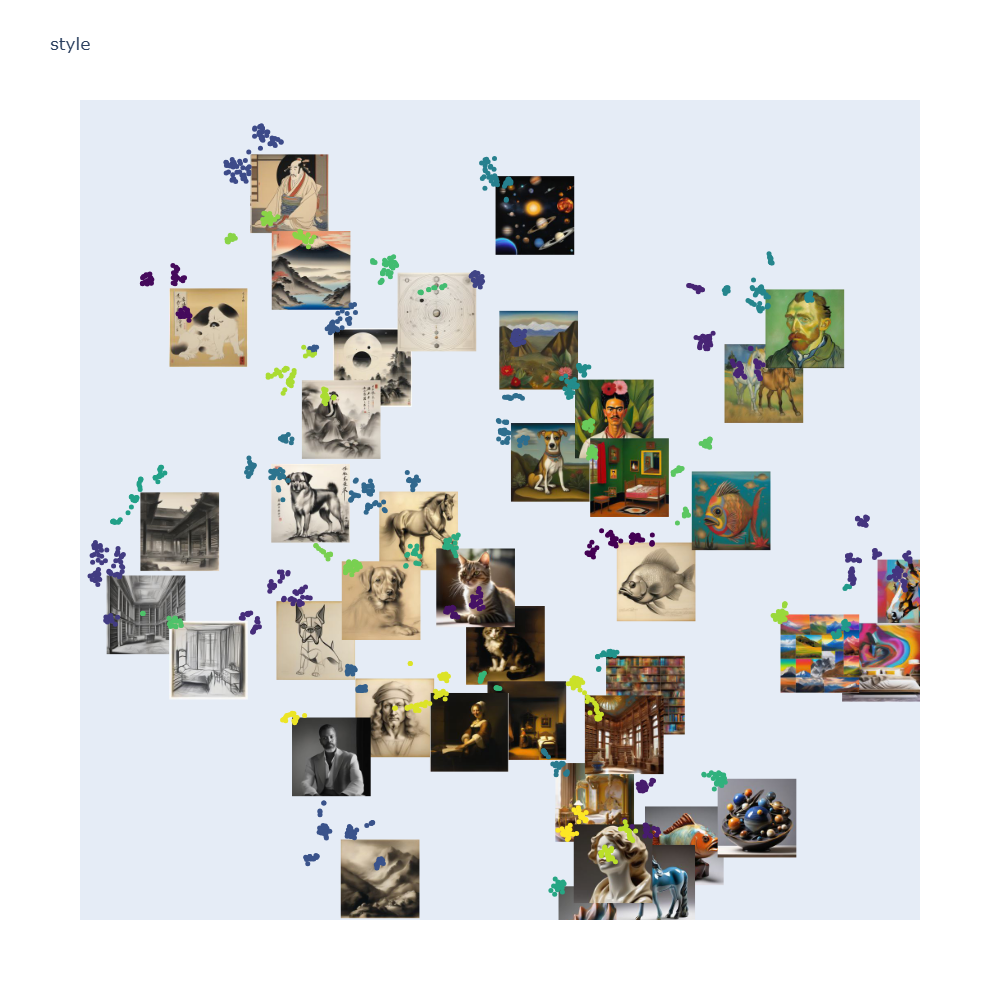
Also, despite the names style vector and content vector, I have noticed by visual inspection that both are basically equally good for style embedding. I don't know why, but I guess that's life? (No, it's actually not supposed to happen. I don't know why it didn't really disentangle style and content. Maybe that's a question for a small research paper.)
You can see for yourself by changing the line style_output = output["style_output"].squeeze(0) to style_output = output["content_output"].squeeze(0) in the demo. The resulting t-SNE is still clustering by style, to my eyes equally well.
Go to examples and run the example.ipynb notebook, then run tsne_visualization.py. It will say something like Running on http://127.0.0.1:49860. Click that link and enjoy the pretty interactive picture.
import copy
import torch
import torch.nn as nn
import clip
from transformers import CLIPProcessor
from huggingface_hub import PyTorchModelHubMixin
from transformers import PretrainedConfig

class CSDCLIPConfig(PretrainedConfig):
    model_type = "csd_clip"

    def __init__(
        self,
        name="csd_large",
        embedding_dim=1024,
        feature_dim=1024,
        content_dim=768,
        style_dim=768,
        content_proj_head="default",
        **kwargs
    ):
        super().__init__(**kwargs)
        self.name = name
        self.embedding_dim = embedding_dim
        self.content_proj_head = content_proj_head
        self.task_specific_params = None  # Add this line

class CSD_CLIP(nn.Module, PyTorchModelHubMixin):
    """backbone + projection head"""
    def __init__(self, name='vit_large',content_proj_head='default'):
        super(CSD_CLIP, self).__init__()
        self.content_proj_head = content_proj_head
        if name == 'vit_large':
            clipmodel, _ = clip.load("ViT-L/14")
            self.backbone = clipmodel.visual
            self.embedding_dim = 1024
            self.feature_dim = 1024
            self.content_dim = 768
            self.style_dim = 768
            self.name = "csd_large"
        elif name == 'vit_base':
            clipmodel, _ = clip.load("ViT-B/16")
            self.backbone = clipmodel.visual
            self.embedding_dim = 768
            self.feature_dim = 512
            self.content_dim = 512
            self.style_dim = 512
            self.name = "csd_base"
        else:
            raise Exception('This model is not implemented')

        self.last_layer_style = copy.deepcopy(self.backbone.proj)
        self.last_layer_content = copy.deepcopy(self.backbone.proj)

        self.backbone.proj = None

        self.config = CSDCLIPConfig(
            name=self.name,
            embedding_dim=self.embedding_dim,
            feature_dim=self.feature_dim,
            content_dim=self.content_dim,
            style_dim=self.style_dim,
            content_proj_head=self.content_proj_head
        )

    def get_config(self):
        return self.config.to_dict()

    @property
    def dtype(self):
        return self.backbone.conv1.weight.dtype

    @property
    def device(self):
        return next(self.parameters()).device

    def forward(self, input_data):

        feature = self.backbone(input_data)

        style_output = feature @ self.last_layer_style
        style_output = nn.functional.normalize(style_output, dim=1, p=2)

        content_output = feature @ self.last_layer_content
        content_output = nn.functional.normalize(content_output, dim=1, p=2)

        return feature, content_output, style_output

device = 'cuda' if torch.cuda.is_available() else 'cpu'
model = CSD_CLIP.from_pretrained("yuxi-liu-wired/CSD")
model.to(device);
import torch
from transformers import Pipeline
from typing import Union, List
from PIL import Image

class CSDCLIPPipeline(Pipeline):
    def __init__(self, model, processor, device=None):
        if device is None:
            device = "cuda" if torch.cuda.is_available() else "cpu"
        super().__init__(model=model, tokenizer=None, device=device)
        self.processor = processor

    def _sanitize_parameters(self, **kwargs):
        return {}, {}, {}

    def preprocess(self, images):
        if isinstance(images, (str, Image.Image)):
            images = [images]

        processed = self.processor(images=images, return_tensors="pt", padding=True, truncation=True)
        return {k: v.to(self.device) for k, v in processed.items()}

    def _forward(self, model_inputs):
        pixel_values = model_inputs['pixel_values'].to(self.model.dtype)
        with torch.no_grad():
            features, content_output, style_output = self.model(pixel_values)
        return {"features": features, "content_output": content_output, "style_output": style_output}

    def postprocess(self, model_outputs):
        return {
            "features": model_outputs["features"].cpu().numpy(),
            "content_output": model_outputs["content_output"].cpu().numpy(),
            "style_output": model_outputs["style_output"].cpu().numpy()
        }

    def __call__(self, images: Union[str, List[str], Image.Image, List[Image.Image]]):
        return super().__call__(images)

processor = CLIPProcessor.from_pretrained("openai/clip-vit-large-patch14")
pipeline = CSDCLIPPipeline(model=model, processor=processor, device=device)
First, load the model and the pipeline, as described above. Then, run the following to load the yuxi-liu-wired/style-content-grid-SDXL dataset, embed its style vectors, which is then written to a parquet output file.
import io
from PIL import Image
from datasets import load_dataset
import pandas as pd
from tqdm import tqdm

def to_jpeg(image):
    buffered = io.BytesIO()
    if image.mode not in ("RGB"):
        image = image.convert("RGB")
    image.save(buffered, format='JPEG')
    return buffered.getvalue()

def scale_image(image, max_resolution):
    if max(image.width, image.height) > max_resolution:
        image = image.resize((max_resolution, int(image.height * max_resolution / image.width)))
    return image

def process_dataset(pipeline, dataset_name, dataset_size=900, max_resolution=192):
    dataset = load_dataset(dataset_name, split='train')
    dataset = dataset.select(range(dataset_size))

    # Print the column names
    print("Dataset columns:", dataset.column_names)

    # Initialize lists to store results
    embeddings = []
    jpeg_images = []

    # Process each item in the dataset
    for item in tqdm(dataset, desc="Processing images"):
        try:
            img = item['image']

            # If img is a string (file path), load the image
            if isinstance(img, str):
                img = Image.open(img)


            output = pipeline(img)
            style_output = output["style_output"].squeeze(0)

            img = scale_image(img, max_resolution)
            jpeg_img = to_jpeg(img)

            # Append results to lists
            embeddings.append(style_output)
            jpeg_images.append(jpeg_img)
        except Exception as e:
            print(f"Error processing item: {e}")

    # Create a DataFrame with the results
    df = pd.DataFrame({
        'embedding': embeddings,
        'image': jpeg_images
    })

    df.to_parquet('processed_dataset.parquet')
    print("Processing complete. Results saved to 'processed_dataset.parquet'")

process_dataset(pipeline, "yuxi-liu-wired/style-content-grid-SDXL",
                dataset_size=900, max_resolution=192)
After that, you can go to examples and run tsne_visualization.py to get an interactive Dash app browser for the images.